Website Development Process: Full Guide in 7 Steps
Despite conventional wisdom, the core part of website development and design is not necessary for the coding process. Indeed, such technologies as HTML, CSS, and JavaScript give the web we know its shape and define the way we interact with the information. But what usually stays behind the scenes and, at the same time, remains the crucial part of the website development life cycle are the stages of preliminary information gathering, detailed planning, and post-launch maintenance.
In this article, we’ll take a look at how the general website development process may look like. The overall number of development stages usually varies from five to eight, but every time the whole picture stays pretty much the same. Let’s choose the average value.
So, here are seven main steps of web development:
1) Information Gathering,
2) Planning,
3) Design,
4) Content Writing and Assembly,
5) Coding,
6) Testing, Review and Launch,
7) Maintenance.
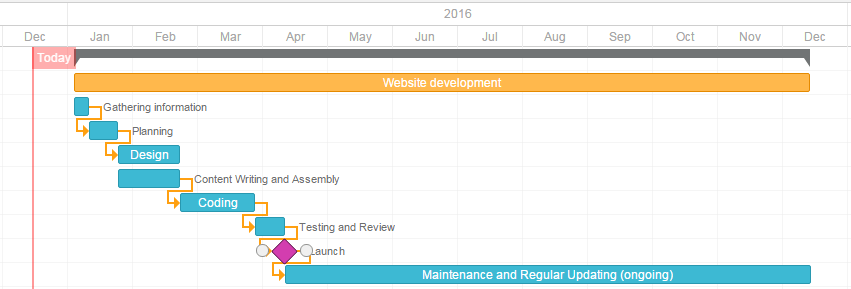
Website Development Timeline
When you think of building a website, your thoughts rotate around two main issues – price and time. These two values depend largely on the size and scope of the project. To outline the whole development process, you can create a website development timeline, adding tasks, and establishing milestones for your project. It is the best way to track your project implementation to make sure you keep up with the deadline.

We’ve prepared a detailed description of the whole website development process, estimated time for each step, and a checklist to double check you don’t miss anything.
Website Development Life Cycle
Step 1. Gathering Information: Purpose, Main Goals, and Target Audience
This stage, the stage of discovering and researching, determines how the subsequent steps will look like. The most important task at this point is to get a clear understanding of your future website purposes, the main goals you wish to get, and the target audience you want to attract to your site. Such kind of a website development questionnaire helps to develop the best strategy for further project management.
News portal differs from the entertainment websites, and online resources for teenagers look different than sites for adults. Different types of websites provide visitors with different functionality, which means that different technologies should be used according to purposes. A well-described and detailed plan based on this pre-development data can protect you from spending extra resources on solving the unexpected issues such as design changing or adding the functionality that wasn’t initially planned.
Estimated time: from 1 to 2 weeks
Step 2. Planning: Sitemap and Wireframe Creation
At this stage of the website development cycle, the developer creates the data that allows a customer to judge how the entire site will look like.
Based on the information that was gathered together in the previous phase, the sitemap is created.
The sitemap should describe the relations between the main areas of your website. Such representation could help understand how usable the final product will be. It can show you the “relationship” between the different pages of a website, so you can judge how easy it will be for the end-user to find the required information or service if he starts from the main page. The main reason behind the sitemap creation is to build a user-friendly and easy to navigate website.
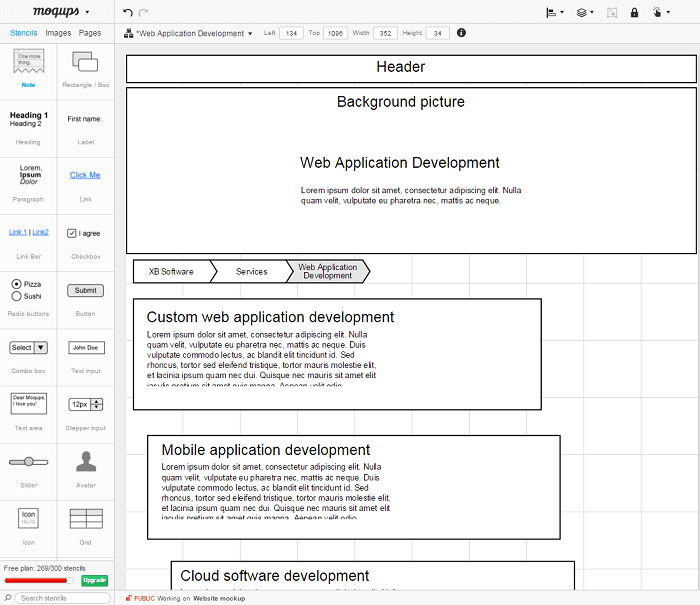
The sitemap allows you to understand how the inner structure of a website looks like but doesn’t describe the user interface. Sometimes, before you start to code or even work on a design, there’s a necessity to get approval from a customer that everything looks fine so you can begin the next phase of developing. In this case, a wireframe or mock-up is created. A wireframe is a visual representation of the user interface that you’re going to create. But it doesn’t contain any design elements such as colors, logos, etc. It only describes the elements that will be added to the page and their location. It’s artless and cheap in production sketch.
You can use any mockup for this purpose. We used Moqups. Here’s how the wireframe can look like:

The other important thing is select technology stack – programming language, frameworks, CMS that you’re going to use.
Estimated time: from 2 to 6 weeks
Step 3. Design: Page Layouts, Review, and Approval Cycle
During the design phase, your website takes shape. All the visual content, such as images, photos, and videos is created at this step. Once again, all the info that was gathered through the first phase is crucial. The customer and target audience must be kept in mind while you work on a design.
The website layout is the result of a designer’s work. It can be a graphic sketch or an actual graphic design. The primary function of the layout is to represent the information structure, visualize the content, and demonstrate the basic functionality. Layouts contain colors, logos, images and can give a general understanding of the future product.
After that, the customer can review the layout and send you his feedback. If the client is not sure about some aspects of your design, you should change the layout and send it back to him. This cycle should be repeated until the customer is completely satisfied.
Estimated time: from 4 to 12 weeks
Step 4. Content Writing and Assembly
Content writing and compiling usually overlaps with other stages of website creation, and its role can’t be underestimated. At this step, it is necessary to put in writing the very essence you’d like to communicate to the audience of your website and add calls-to-action. Content writing also involves the creation of catching headlines, text editing, writing new text, compiling the existing text, etc., which takes time and effort. As a rule, the client undertakes to provide website content ready to migrate to the site. It is better when all website content is provided before or during website coding.
Estimated time: from 5 to 15 weeks
Step 5. Coding
At this step, you can finally start creating the website itself. Graphic elements that have been designed during the previous stages should be used to create an actual website. Usually, the home page is created first, and then all sub-pages are added, according to the website hierarchy that was previously created in the form of a sitemap. Frameworks and CMS should be implemented to make sure that the server can handle the installation and set-up smoothly.
All static web page elements that were designed during the mock-up and layout creation should be created and tested. Then, special features and interactivity should be added. A deep understanding of every website development technology that you’re going to use is crucial at this phase.
When you use CMS for site creation, you can also install CMS plugins at this step if there’s a need. The other important step is SEO (Search Engine Optimization). SEO is the optimization of website elements ( e.g., title, description, keyword) that can help your site achieve higher rankings in the search engines. And, once again, valid code is pretty important for SEO.
Estimated time: from 6 to 15 weeks
Step 6. Testing, Review, and Launch
Testing is probably the most routine part of a process. Every single link should be tested to make sure that there are no broken ones among them. You should check every form, every script, run a spell-checking software to find possible typos. Use code validators to check if your code follows the current web standards. Valid code is necessary, for example, if cross-browser compatibility is crucial for you.
After you check and re-check your website, it’s time to upload it to a server. An FTP (File Transfer Protocol) software is used for that purpose. After you deployed the files, you should run yet another, final test to be sure that all your files have been installed correctly.
Estimated time: from 2 to 4 weeks
Step 7. Maintenance: Opinion Monitoring and Regular Updating
What’s important to remember is that a website is more of a service than a product. It’s not enough to “deliver” a website to a user. You should also make sure that everything works fine, and everybody is satisfied and always be prepared to make changes in another case.
The feedback system added to the site will allow you to detect possible problems the end-users face. The highest priority task, in this case, is to fix the problem as fast as you can. If you won’t, you may find one day that your users prefer to use another website rather than put up with the inconvenience.
The other important thing is keeping your website up to date. If you use a CMS, regular updates will prevent you from bugs and decrease security risks.
Estimated time: ongoing
Conclusions
You should always keep in mind that the website development project doesn’t start with coding and doesn’t end after the day you finally launch your website. The phase of preparation affects all subsequent stages, defining how productive the development process will be. A profound and in-depth discovery of such aspects like age, sex, and interests of your end-user may become the key to success. The post-launch period is rather significant. Your project should be agile and flexible enough to have a possibility to change your website according to users’ feedback or spirit of the time. Keeping in mind that there’s no such thing as insignificant website development phase will prevent you from unexpected troubles and give you confidence that everything flows as it should, and you have full control over the project.
Hopefully, this article provided you with valuable information, and we can develop your website with ease.
